

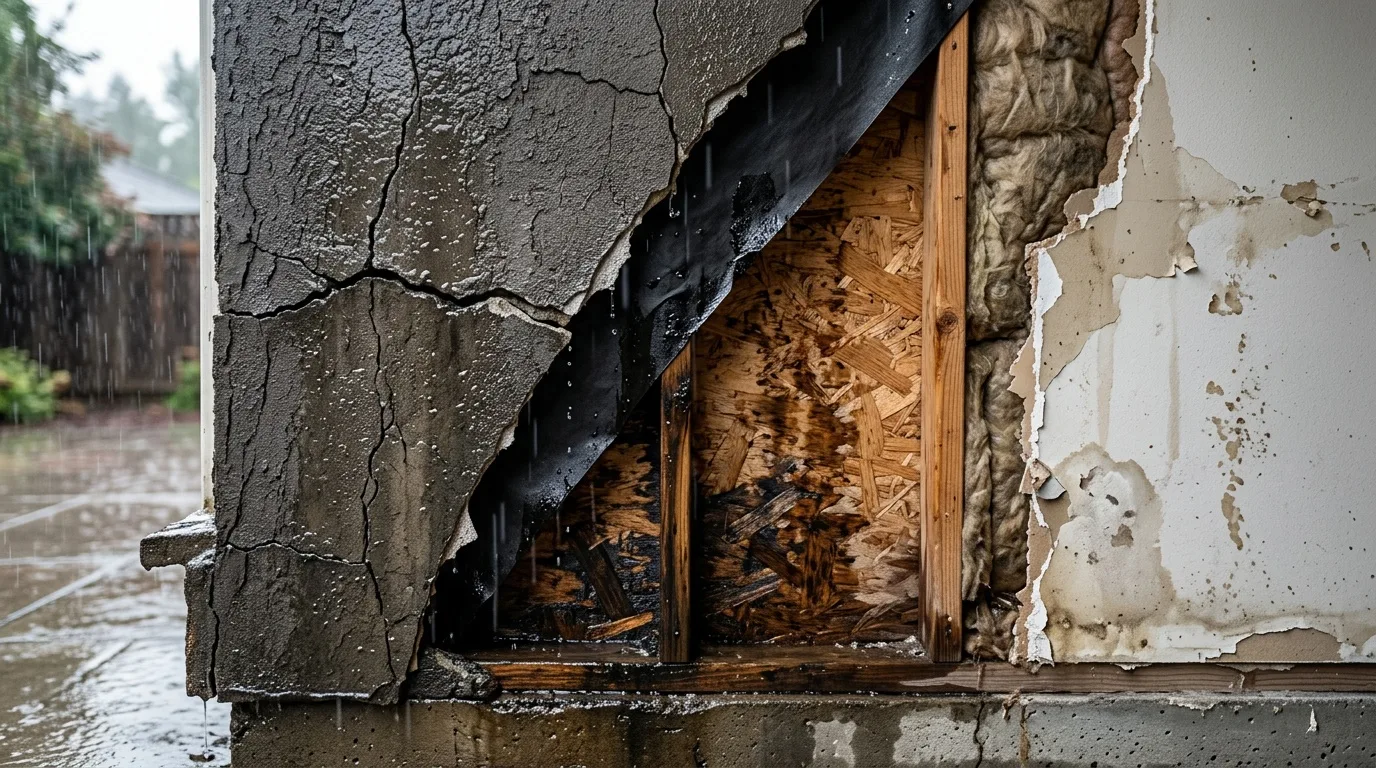
If the inside of a wall gets wet only after rain blown by the wind, and in ordinary weather it stays dry, the problem almost always has to do not with the wall itself but with how water gets onto it from the outside. An inside wall wet after rain is a common complaint in single-family houses and in rooms right under the roof.
The main difficulty is that the place where the wet spot shows up inside the room is often far from the real point where water gets in. Rain can get behind the stucco, run along a crack, a joint or a hidden cavity and come out somewhere else entirely. To solve the problem for good, you need not just to patch the damp area from the inside, but to understand the route the water takes.
Below we go through why this happens, which causes come up most often and what to do in different situations. For Escondido homeowners who are already looking at a soaked wall, our page on water damage restoration in Escondido homes explains how wet structures are dried out.
Why wind-driven rain makes the inside of a wall wet
In ordinary vertical rain, water mostly falls from the top down: onto the roof, the eaves, the sills and the upper part of the wall. A house is usually designed for exactly that scenario.
Wind-driven rain works differently. In a strong wind, drops fly at an angle and land where ordinary rain hardly reaches:
- Joints between exterior materials - where stucco meets trim, siding or another finish.
- Cracks in the stucco - including hairline ones that look harmless.
- Seams around openings - the edges of window and door flashing.
- Places where the roof meets the wall.
- Behind siding, panels or other cladding.
The problem shows up most often on walls that face the prevailing wind. A wall that gets wet only on the windward side is a typical sign that water is not passing through the body of the wall but through a weak point on the outside.
Where water most often gets into the wall
Before any repair, look not for the wet spot itself but for the possible path the water moves along. The main problem areas look like this.
Cracks in the stucco
Even a small crack can become a channel for water. Vertical cracks at the corners of a building and horizontal cracks near floor lines are especially risky.
From outside, such a crack may look minor, but during wind-driven rain the wind literally forces water inside. Then the moisture spreads through the material and appears inside the room. This is how a lot of stucco water damage starts, and water damage from a crack in stucco often stays hidden for a long time.
A facade rarely cracks "just because." Sometimes it is a thin web of cracks after the house settles, and sometimes it is the first signal that the structure is losing its protection against moisture, temperature swings and load. Most often cracks in stucco appear because of:
- Natural settling of a new house.
- Mistakes in how the stucco was applied.
- Temperature swings between hot days and cool nights.
- Water getting under the finish coat.
- Errors when the wall was insulated.
- Movement of the foundation.
- Vibration from nearby construction or a busy road.
If the stucco has cracked next to openings, at joints or at the corners of the building, it is better not to put off an inspection.
Window and door flashing
Openings are one of the most common places where water gets into a wall. The cause is usually not the window or door itself but the installation around it:
- The sill flashing has no proper slope.
- The side joints are not sealed.
- Water gets in behind the exterior trim.
- Old sealant has cracked and stopped working.
Inside, the wall does not necessarily get wet directly below the opening. Water can travel inside the wall and show up lower or off to the side.
The roof, gutters and wall connections
If the upper part of the wall gets wet, especially near the ceiling, it is worth checking not only the stucco but also having a roofer check the roof. Common causes:
- Damaged roofing.
- Incorrect flashing around a chimney or where the roof meets a wall.
- No proper drainage off the roof.
- Clogged gutters, so water overflows onto the wall.
If gutters are pointed the wrong way or clogged, water can collect at the walls and get inside.
Penetrations and cladding that does not shed water
Pay special attention to corners, joints between materials and holes for fasteners and anything mounted on the wall. Siding, decorative panels and other exterior materials are not always a fully waterproof barrier. They are supposed to work together with an air gap and a proper way of draining moisture. If water gets behind the cladding and has no way back out, it can build up and move into the structure.
The base of the wall, grading and sprinklers
Check the foundation and the base of the wall, where the stucco ends at the weep screed. Look for cracks or breaks in the waterproofing that water can get through. If the wall is wet from the bottom up, moisture may be coming from the ground through the foundation.
Make sure drainage around the house works and that water does not pool at the foundation. Soil sloped toward the house and sprinklers that wet the wall keep that base damp. If the problem is standing water around the foundation, the drainage needs to be improved or new drainage put in.
How to tell a rain leak from other causes of dampness
A wet wall does not always mean a problem with rain. Sometimes the cause is something else entirely, so before a repair it helps to compare the signs:
- Condensation - moisture collects on inside walls because of poor insulation, and it is not tied to rain.
- A roof leak - the spot appears after heavy rain, usually high on the wall.
- Pipes and plumbing - leaks in pipes, especially ones hidden in walls, keep the wall damp all the time. Check all the pipes, especially where fixtures connect.
A simple rule: if the wall gets wet only after rain from a certain direction, the search for water in walls after rain almost always needs to start on the outside.
Diagnosing where the water gets in
Trying to cover the wet spot inside the room right away often ends with doing the repair twice. It is better to work step by step:
- Record the conditions. Write down after which rain the moisture appeared: wind direction, how hard it rained, when the spot showed up.
- Inspect the outside wall. Look for cracks, broken joints, drip marks, damage to the finish.
- Check the areas above from the ground. Water often comes from higher up: through the eaves, the roof, an opening or a wall connection.
- Check the joints. Pay particular attention to corners, places where materials meet and fastener holes.
- Fix the cause outside. Patching and paint inside hide the damage but do not stop the water.
Inspect the wall right after rain - a dry surface can hide the problem. Sometimes the entry point can be found by eye. But if the wall is complicated or the water travels inside it, several areas may have to be checked one by one. If you cannot find or fix the cause yourself, it is better to call pros who survey the wall with dedicated equipment and pinpoint the source. You can read who we are and how we work before you call anyone.
Moisture in the insulation and drywall
At first it seems the problem is only how the wall looks. But the consequences are usually more serious.
Moisture gradually works its way into the structure. Dampness appears, then fungus, and the finish layers start to break down. Heat escapes through the damaged wall, and wet insulation in the wall holds water instead of keeping the room comfortable. If the insulation was installed the wrong way, extra moisture can collect in it at cold spots.
A small defect left alone grows quickly. Over time a local repair can turn into a full rebuild of the wall. When the wet section has to be opened up, furniture and belongings in the room are often moved out first; this is what pack-out and contents protection is for.
After the cause is fixed, the wall has to dry completely before any finish work. Use dehumidifiers in the room to pull extra moisture out of the air and speed up drying, and make sure the rooms are well ventilated.
The right repair order
Many repairs fail not because the materials are bad, but because the cause is never removed. A reliable fix usually has several stages:
- Find where the water gets in.
- Assess the stucco and the joints. Tap around a crack to find loose areas and judge how deep the damage goes.
- Remove the defect the moisture passes through. Weak areas and peeling finish are taken off, cracks are filled with repair compound, and the protective coat is restored.
- Let the structure dry.
- Only after that, restore the inside finish - new plaster or drywall, paint.
When repairing an outside wall, look not only at the material that closes the crack but also at why the crack appeared. For example, if a joint keeps moving with temperature changes, a simple rigid patch may crack again.
The mistakes people make most often:
- Covering the spot from inside and forgetting it. Primer, patching compound and paint can hide the traces of moisture for a while. But if water keeps getting into the wall, the damage will come back.
- Sealing everything in sight. Sometimes a person puts sealant on every visible gap without checking the cause. This can close off the way out for moisture and lead to water building up inside the wall.
- Ignoring small cracks. A small crack in the stucco seems harmless, but these are exactly the places where water often starts getting in.
- Changing the finish instead of fixing the structure. New paint or decorative plaster will not solve the problem if water comes in through an opening, the roof or a badly installed flashing.
Mold after rain gets into the wall
If you repaint the wall without removing the cause, mold can show up on it. After the wall dries, treat it with an antimicrobial product to keep mold from appearing, and only then repair the finish.
Do not close up a wall that is still wet behind the surface. Moisture left in the insulation and drywall turns into mold you cannot see until it is already spread through the cavity.
The EPA's guide to mold, moisture and your home explains why the moisture source has to be fixed before cleanup. If growth is already visible, see our page on mold remediation for Escondido homes. The same logic applies indoors, as in our guide to preventing mold after a plumbing leak.
The main takeaway
A wall does not get wet after wind-driven rain by chance: water finds a weak spot in the house's protection and gets in through cracks, joints, flashing, the roof or wall connections. The most common mistake is fighting the spot inside the room without removing the water's path outside.
The right order is simple: find where the water comes from, fix the outside cause, wait for the structure to dry and only then deal with the finish. This approach takes more attention at the start but saves you from repeat repairs. You can read what homeowners say in our customer reviews from local jobs, browse more water and mold articles, or go back to the restoration company home page.