

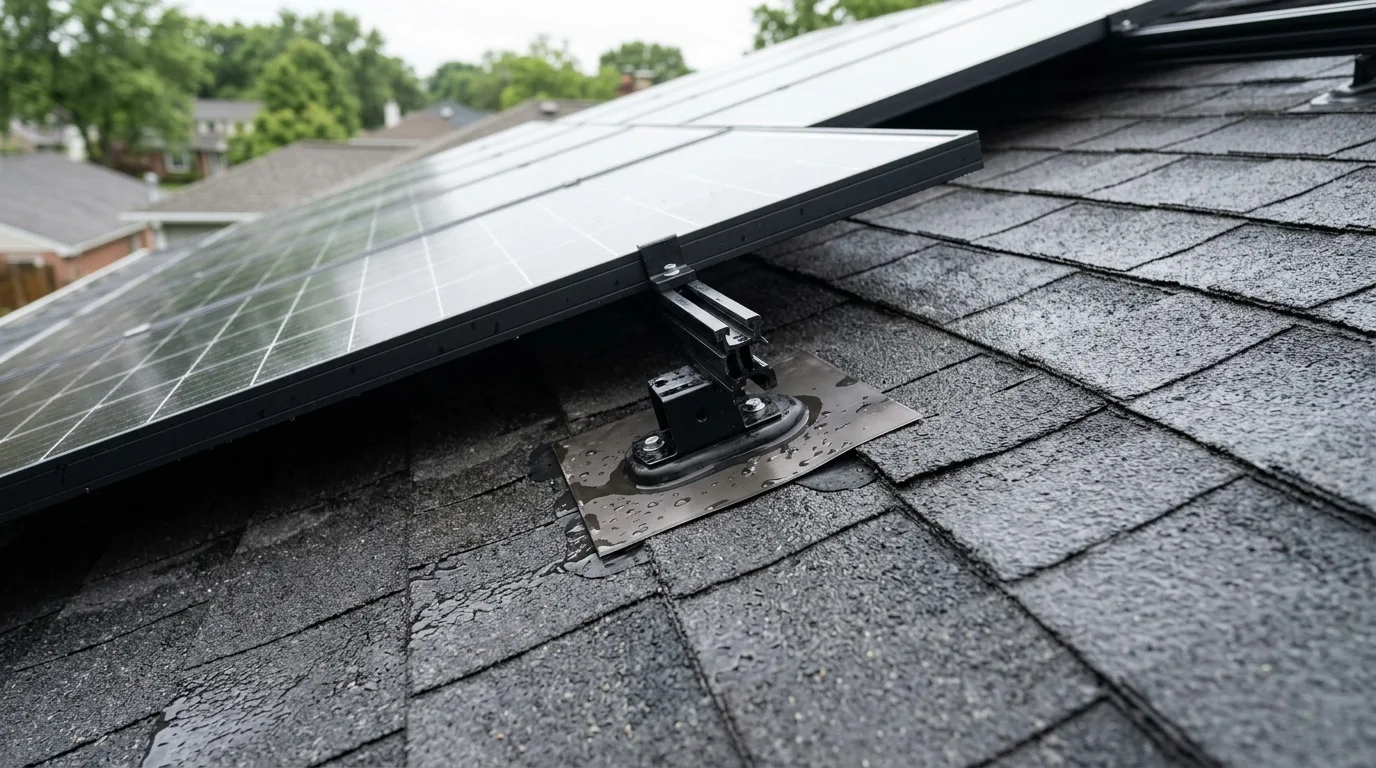
A typical case: a few months after the panels went up, a stain shows up on the ceiling under the array. The cause is rarely the panels themselves: it is a mount that was not flashed, a tile cracked during installation, or a lag bolt that missed the rafter.
Cases like this are not about "cheap panels." A solar panel roof leak almost always comes from ignoring how the roofing material works. Below: how the mounts go through the roof, which mistakes lead to leaks, how to spot water getting in, who to call, and what to do with wet insulation and drywall afterwards.
How solar mounts go through the roof
On most pitched roofs the rails that hold the panels sit on brackets or hooks, and those are fastened through the roof covering into the framing below. Every one of those fasteners is a hole in the roof. Each hole is a possible path for water. Ignoring that means budgeting for repairs from the very first bolt.
The way the penetration is made depends on the type of roof:
- Tile roofs. Tiles are lifted or cut, and the mount sits on a flashed base fastened into a rafter.
- Asphalt shingles. The mount is lagged into a rafter through a metal flashing slid under the shingle course above.
- Metal roofs. Clamps on the seams, or screws with bonded washers in the flat of the panel.
- Flat roofs (PVC, TPO). Ballasted racks or flashed supports.
Where leaks around the mounts usually come from
On tile roofs, leaks most often come from tiles cracked during installation and from mounts set without proper flashing; on shingle roofs, from lag bolts that missed the rafter and from sealant used instead of flashing.
Signs of a leak after solar installation
Often the people in the house do not notice at first that something is wrong. Water can travel a long way before it shows. The source of a leak may be far from the place where water drips onto the floor or comes through the finish.
- Ceiling stains under the array. Wet spots appear on the ceiling, usually below the part of the roof covered by panels. Damp drywall may begin to sag.
- Drips and wet wood in the attic. Look for rust on metal parts, dirt streaks, and wet sheathing boards in places that do not touch the rafters.
- Water tracks on the rafters. Water often runs along them from the actual leak point to the walls or posts. Wood soaks up moisture well, so the tracks are usually easy to see — just follow them up to where the water comes from.
- A musty smell. Under a finished ceiling the problem is harder to see, but it can be recognized by the smell of damp.
- Rooms getting cooler. Wet insulation holds heat poorly, and turning the heat up does not help.
When you check the insulation itself, pay attention to how it is wet. Insulation that is wet only at the edge and more or less dry in the center usually means water simply ran down the rafters. Large areas of wet insulation occur only at the point of the leak.
A ceiling that is stained, soft or sagging below the panels can hold a lot of water, and soaked plaster or drywall can come down. Keep people and pets out from under it and do not poke at it from below.
Once the spot is found inside, you still need to understand the cause, and for that the area has to be looked at from the outside too. Tightness around the mounts can be checked without waiting for rain:
- Water test. The installer or roofer pours about half a gallon of water over the penetration area, waits a few minutes and checks from inside. Even one drop means the mount needs to be resealed.
- Smoke test. Smoke from a generator is let into the attic's ventilation; smoke around a mount means the seal is broken.
- Thermal camera. In cold weather the cold bridges at the penetrations show up as dark spots.
Who to call: the installer or a roofer
The installer who put the system on the roof is the first call, because the penetrations are their work. If the panels have to come off to reach the leak, that is also a job for the solar contractor. A roofer is needed when the damage is in the roofing itself — cracked tiles, rotted sheathing, flashing that has to be redone.
In California, solar systems are installed by licensed contractors; the C-46 Solar classification covers solar energy systems. Before you hire anyone to remove, reinstall or repair the array, check the contractor's license on the CSLB website. The CSLB's Solar Smart consumer page is a good place to start.
Records for a solar panel roof leak warranty claim
The installer's workmanship warranty and the roof's warranty are separate documents, and a claim under either one goes easier with records. Keep:
- Photos and video of the stains, drips and wet insulation, taken before anything is cleaned up or torn out.
- Photos of the mounts from the outside and from the attic.
- The contract and warranty from the solar installation, and any paperwork on the roof's condition before the work.
- Every request in writing — dates, who you spoke to, what was promised.
Drying attic insulation and drywall
Most insulation used in roofs — mineral wool, fiberglass and the like — is porous or fibrous. Inside the material there are many voids filled with air, and that is what keeps heat in. The same thing makes the material absorb water readily. When insulation gets wet, the voids fill with water and its ability to hold heat drops sharply. You get heat loss, wet spots on the ceiling and the risk of mold.
Wet insulation does not always mean tearing everything out. Many modern insulation materials are treated with water-repellent agents that reduce absorption. Mineral wool, for example, is often treated this way, so it "resists" water and is easier to dry. Lightly damp fiberglass can sometimes be dried; soaked or matted insulation and wet cellulose are replaced.
People often try to dry insulation with space heaters to save money. That does not work, especially when the insulation sits under the roofing. The same goes for airing out — even a good draft will not pull moisture out of the material. Professional drying equipment draws moisture out of the material itself rather than off the surface, and it can dry insulation under the roof covering without taking the assembly apart. The work goes in stages, from the wettest areas to the drier ones, and the moisture is taken outside the area being dried. The amount of work depends on the area and how wet the material is.
Where a finished ceiling has to be opened to find the leak, the inside finish is removed carefully at the spot where water collects. Drywall, plywood, OSB and soaked insulation are better thrown out right away. Wood boards can be dried if they have not started to rot. If the rafters are only slightly damp, they usually dry without much trouble. If they are soaked through, drying takes much longer, often with the boards held in place so they do not warp. If the wood has started to rot, the rafters are replaced or reinforced.
After the leak is sealed, the roof underlayment is restored and the framing is dried. Only after that is new insulation laid. If the ceiling below the array is coming down, furniture and belongings in that room may need to be moved out first — that is what pack-out and contents storage services are for. For the whole sequence of extraction, drying and repair, see our water damage restoration services in Escondido.
Mold after solar panels leaking into the roof
Higher humidity in the house leads to mold. It ruins finishes and it is not safe for people or pets: spores travel through the air and get into the airways, food and water, and can cause respiratory problems. Wet insulation also exposes the roof's lumber and metal parts to moisture. Rot eats into wood, and over time that weakens the structure. Metal starts to rust, and corrosion lowers the load-bearing capacity of the metal parts.
That is why wet materials should not be left for long. If mold has already appeared on the rafters or drywall, it may need professional treatment — read about mold remediation for Escondido homes. Many of the steps are the same as after any household leak; our guide on preventing mold after a plumbing leak covers them in more detail.
In short
- Find the source of the leak. It may be far from where you first saw water.
- Check the mounts. Flashing, cracked tiles, lag bolts in the rafters.
- Call the installer, and a roofer if the roofing itself is damaged. Keep records of everything.
- Dry or replace wet materials before mold starts.
You can learn more about our restoration team, read what Escondido customers say, browse more water and mold articles, or start again from our home page.